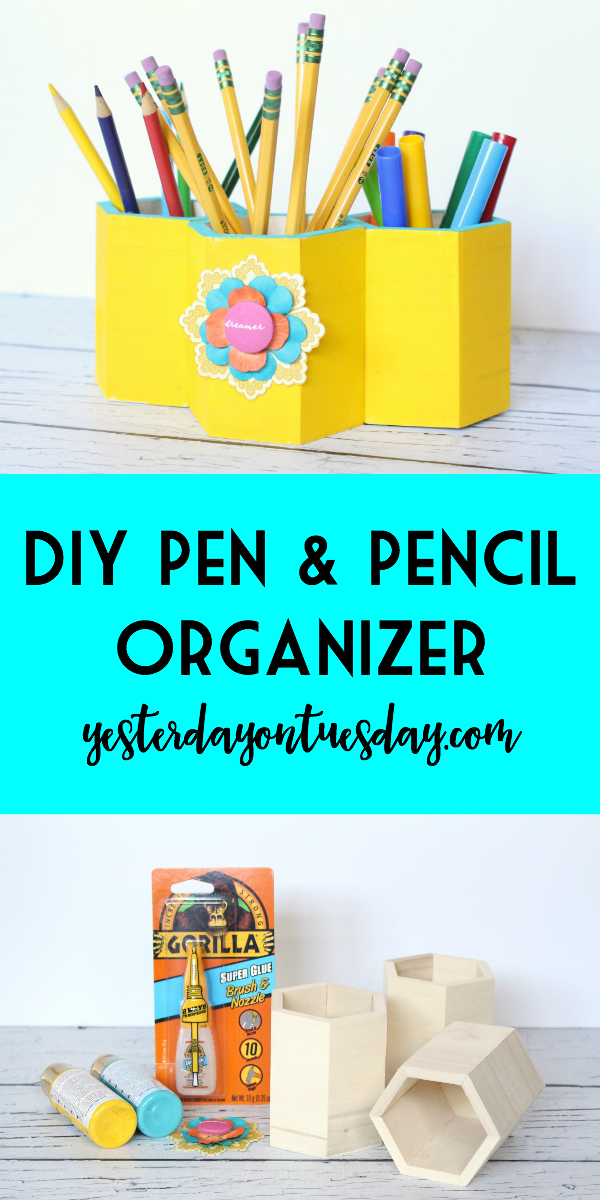
Mason Jar Business Cards
{Mason Jar Business Cards}
Hello! I recently found myself in a “pickle” (oops unintentional play on jars there) when I was packing my stuff up for an event and I realized I was down to my last few business cards. There was no time to order any so I needed to make them, and fast! Here’s how I created these Mason Jar Business Cards and let me tell you, it was super easy and quick.
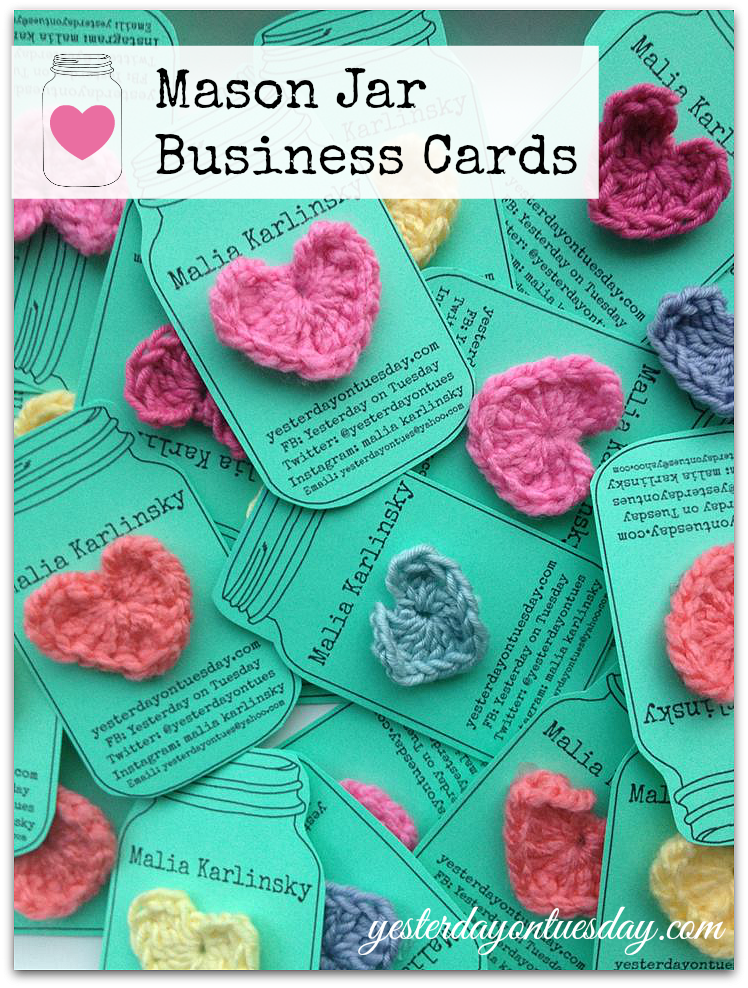
Mason Jar Business Cards Supplies
-FREE Mason Jar Clip Art from Sweetly Scrapped. I am so grateful that Emily from Sweetly Scrapped shared this free Mason Jar art. There are quite a few choices! Visit her blog to see them all.
-PicMonkey: PicMonkey is a FREE photo editing site. You can also pay $5 a month more and get the deluxe version of all they have to offer.
-8 1/2 x 11 inch cardstock: I used “Sugar Candy” Michaels brand cardstock which comes in pack of five colors.
-Hearts: You could use a paper punch to make hearts, use a free graphic heart in PicMonkey, or use crochet hearts. I bought mine from Raising Up Rubies (LOVE the blog and the shop).
-Glue Dots
Instructions
1. Stop by Sweetly Scrapped, choose a Mason Jar image and save it to your computer. Be sure to say “Thanks, Girl!” to Emily when you’re there.
2. Visit PicMonkey and click one the “Photo Editing” function.

3. When you click edit it will give you a choice of where to get the image from. Choose computer and upload your Mason Jar image.
4. Now you can choose your font by clicking on the text function. It looks like ” Tt.” I used “Special Elite.” Click the font you want and a box opens up “add text.” Add your text and center it on the jar.
5. Play around with the info you want to add. When you’re happy with it, click the “x” in the corner of the text box. You can also mess around with the color and size of the text here.
6. If you want to add a heart, click on the “overlays” icon, which looks like a butterfly. Choose “hearts” and it will give you a bunch of options. Click on the heart you want, choose the color you want and adjust the size. OR leave a space for a paper or crochet heart.
7. When you’re satisfied, click “save” which you’ll find on the top in the middle.
8. PicMoney will give you the option to save as jpeg or png… I like png.
9. Name your work and save it to desktop.
10. Then open it up and choose “print.” I made 6 images for each sheet.
11. Print and cut out jars.
12. If desired, add paper or crochet heart with glue dots.

über über cutte!!!
eva scott recently posted…Ninja Turtle Wreath
Thanks so much Eva! xoxo
Oh my gosh, these are adorable!! Love them :)
Thanks Kristin!
These are so darling Malia! I love them!!
Beverly {Flamingo Toes} recently posted…Pretty DIY Fabric Feathers Dishtowel
Thanks Bev!
So cute, Malia! Love the sweet gift too! :)
Roeshel recently posted…DIY & Show Off: That DIY Party Room Makeover Highlights
How cute! You are so creative!
These are so cute!!
Absolutely darling!
Oh, Malia, I absolutely love these! Vintage Savvy :)
Mary Beth|Cupcakes and Crinoline recently posted…How to Upcycle a Basket with Old Leather Belts
How stinkin’ cute! I am so inspired now! I needed a good idea for something to put my hair clips on for a craft fair I’m doing… this might just work for me! Stopping by from the LInk a Palooza and glad I did!!
Roberta @ Mommy Like Whoa recently posted…Feature Friday! DIY Rosette Tea Bags (inspired by NorthStory!)
So happy to “meet” you! Following you via social media so I can keep up with all your great projects!
These are so cute! Great tips for the next time I run out of cards!
Heather recently posted…A Fun Way to Display your Bucket List Wishes #bufferinbucketlist
So cute Malia!! Thanks for sharing at Tickled Pink Times Two. Make it a pink day!
Meegan recently posted…Book Page Labeled and Embellished Water Bottles
Thanks Meegan! xo
OMG, those are the cutest business cards EVER!!! What an adorable gift and way to help people remember you!
Michelle recently posted…Cake Pop Holder
Your business cards are totally aDORable, Malia! Love, love, love them! (Just saw them at the Reader’s Choice over at the Live Laugh Rowe linky party! :)
Laura / Pet Scribbles recently posted…St. Patrick’s Day craft: Shamrock Miniature Art Canvas
These are so cute! =)
Melissa @ My Recent Favorite Books recently posted…Review: Brownies and Broomsticks by Bailey Cates