Stunning DIY Art
Stunning DIY Art
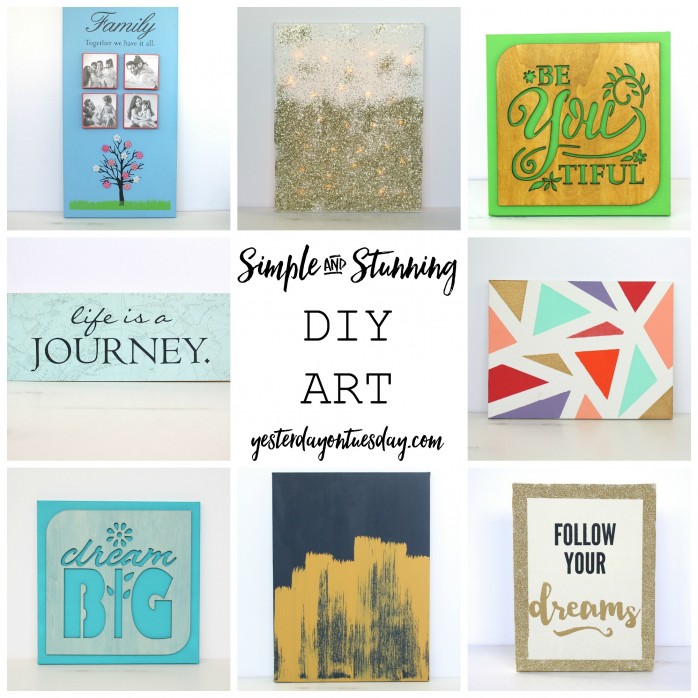
When you think of art do you think of expensive paintings hanging on the walls of a ritzy gallery? It’s really not that hard to make your own art at home… it just looks expensive! All the craft supplies used for these projects is from Ben Franklin Crafts and Frames in Redmond.

1.Paintbrush Art: Make a bold statement with gold paintbrush art. To create your own paintbrush art, you just need a canvas (this canvas measures 12” x 16”) dark blue acrylic paint, gold acrylic paint and a large paintbrush.
First, paint a few coats of the blue on the canvas, letting each layer dry completely. Then pour some gold paint onto a paper plate. Dip the tip of the paint brush into the gold paint. Next, position the brush midway on the canvas and drag it down to the edge of the canvas. Continue until the gold brush strokes stretch across the canvas.

2. Stained Wood Art: A single coat of wood stain gives a plain laser wood cutout color and personality. Here’s a fun twist— wood stain doesn’t just come in “wood” colors anymore, there are many different hues available.
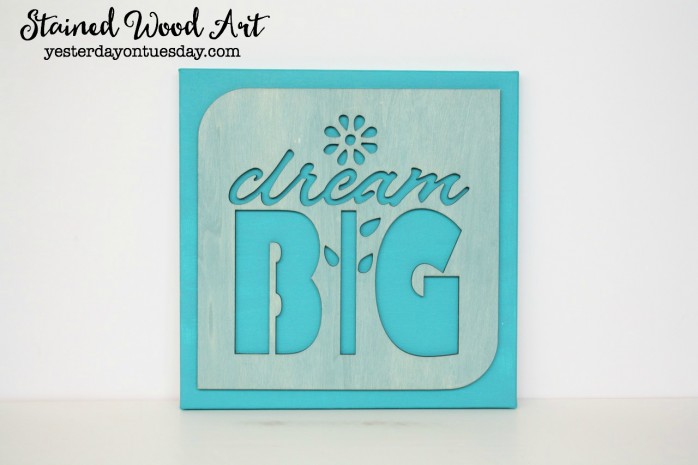
For each of these pieces of stained wood art, you’ll need a canvas (these measure 12” x 12”), a laser wood cutout, brightly colored acrylic paint (we used green and turquoise), wood stain (these are Wood Tint by FolkArt in Oak and Cascade) and craft glue.
First, stain the laser wood cutout. Just one coat makes a big impact, but continue staining until you get the color you want. While that’s drying, paint a 12 x 12 canvas with acrylic paint. When all the pieces are dry, use craft glue to attach the wood cut out to the canvas.
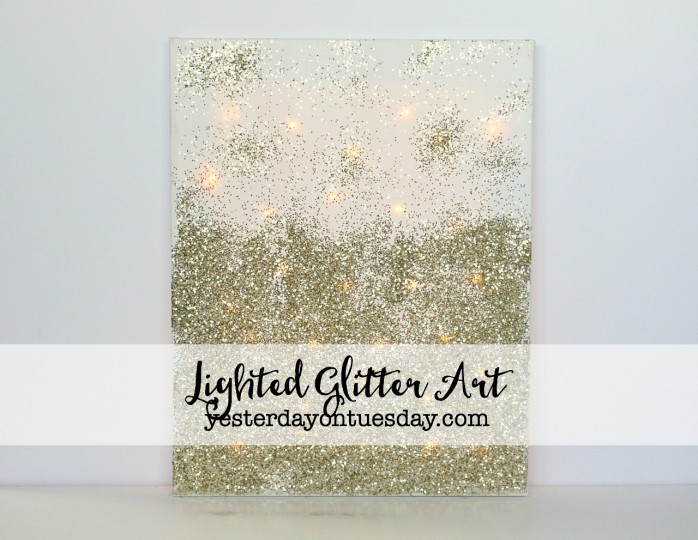
3. Lighted Glitter Art: You can make any room bright and sparkly with the easy to make glitter art. Get a canvas (this one measures 11” x 14”), Mod Podge, chunky gold glitter, a paintbrush and firefly lights. You’ll also need masking tape.
Use masking tape to secure the strand of lights to the back of the canvas. Flip the canvas over and paint a layer of Mod Podge on top. While it’s still wet, sprinkle glitter on the canvas, going from a lighter layer to a heavier layer. Flip the “on” switch and you’ll have some beautiful art.
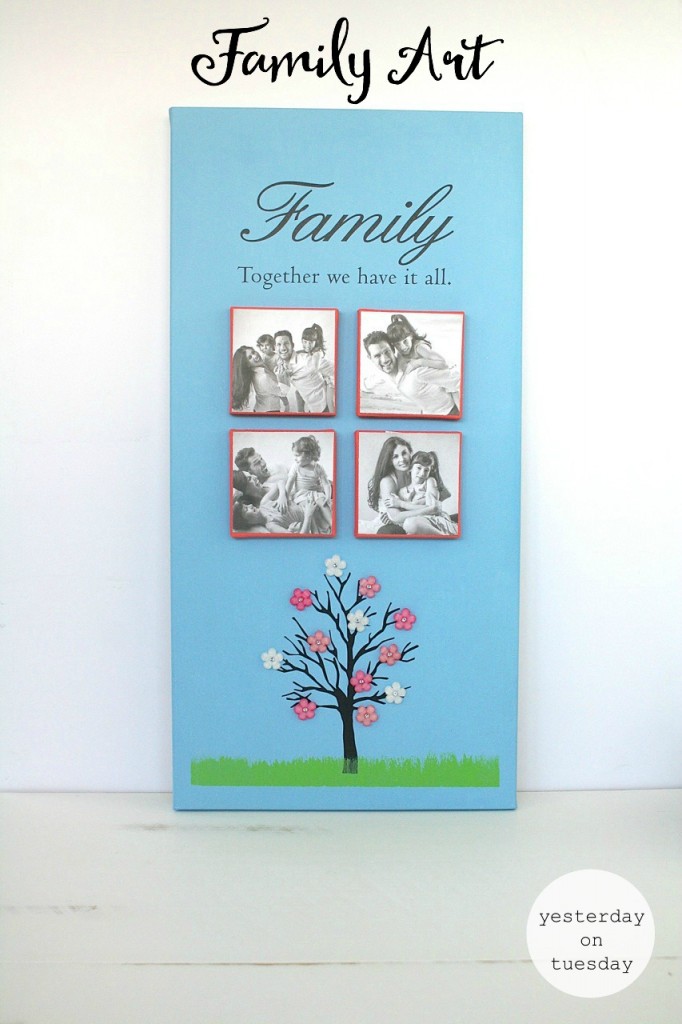
4. Family Art: Celebrate your loved ones with this simple Family Art. Grab a long canvas (this one measures 10” x 20”), four 3” x 3” square canvases, blue, green and coral acrylic paint, 3-D flower stickers, vinyl words “Family Together We Have it All,” vinyl tree (all vinyl from Decorating Your Life) and craft glue. Don’t forget to have four cute family photos (measuring 3” x 3”) and doubled sided tape on hand as well.
Start by painting the canvas blue and the four small square canvases coral. When the paint is dry, add the vinyl words and tree to the canvas. Then use the green acrylic paint to make grass at the base of the tree. Next, use doubled sided tape to attach the family photos to the square canvases. Adhere them to the larger canvas with craft glue. Finish by placing the 3-D flower stickers on the tree.
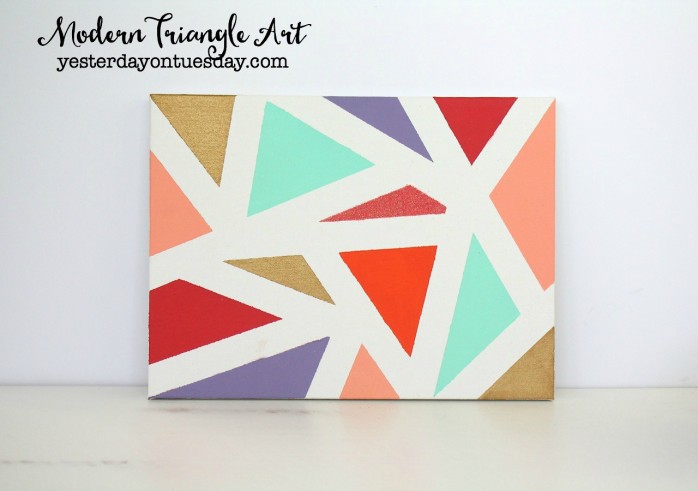
5. Modern Triangle Art: Add a pop of color to your home with this modern looking art. For this piece, you’ll need a canvas (this one measures 9” x 12”), a few bottles of acrylic paint (this artwork features seven), fine glitter the same color as one of the paints you’re using, Mod Podge and masking tape.
Tape off sections of the canvas, forming triangles. Next paint the triangles, being careful to keep the same colored triangles apart from each other. You may need multiple coats of paint to get the desired shade. Remove the masking tape. Next paint Mod Podge on the triangle that matches your glitter. Add glitter.
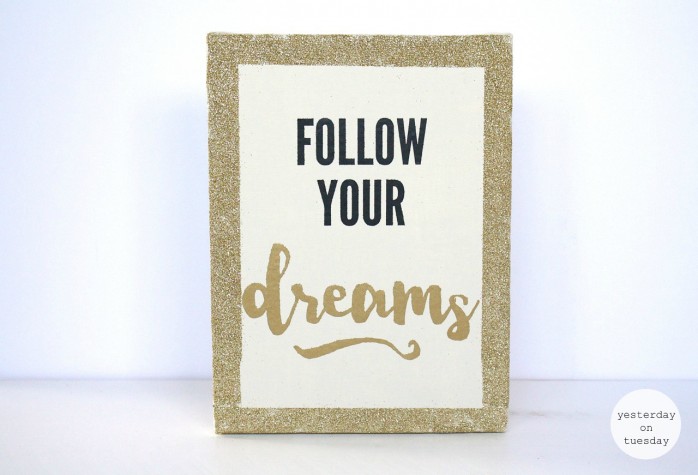
6. Glittered Follow Your Dreams Art: This would be fun in a girl’s room— girls of any age (from kids to grandmas) would love it! Get a small canvas (this one is 6” x 8”), cream colored acrylic paint, Mod Podge, fine gold glitter, masking tape, and “Follow Your Dream” vinyl by Decorating Your Life.
Paint the canvas cream. Tape off a border around the center. Paint a thin layer of Mod Podge on that border and generously sprinkle fine glitter on it. Remove the tape. Add vinyl words in the center.
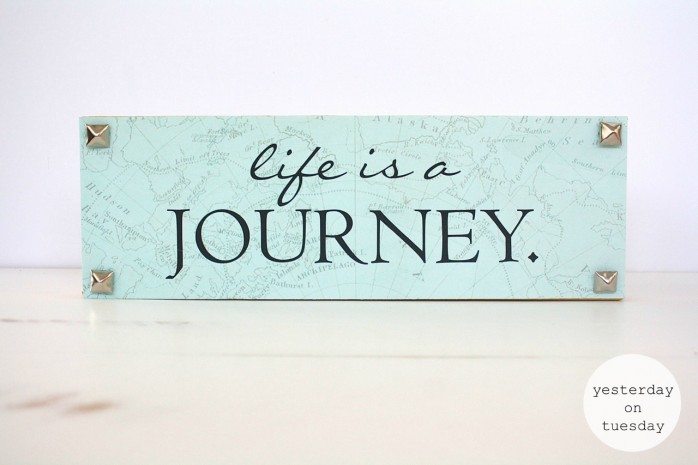
7. Life is a Journey Art: We can all use a little reminder to keep us feeling encouraged. Put together this Life is a Journey piece with a canvas measuring 3” x 12”, a piece of travel themed scrapbook paper, “Life is a Journey” vinyl from Decorating Your Life, wood stain, craft glue and metal brads.
Paint the canvas with the wood stain. Cut a piece of scrapbook paper to 3” x 12”. Glue it to the canvas. Next, add the vinyl words. Finish by gluing the metal brads in the corners.


One Comment