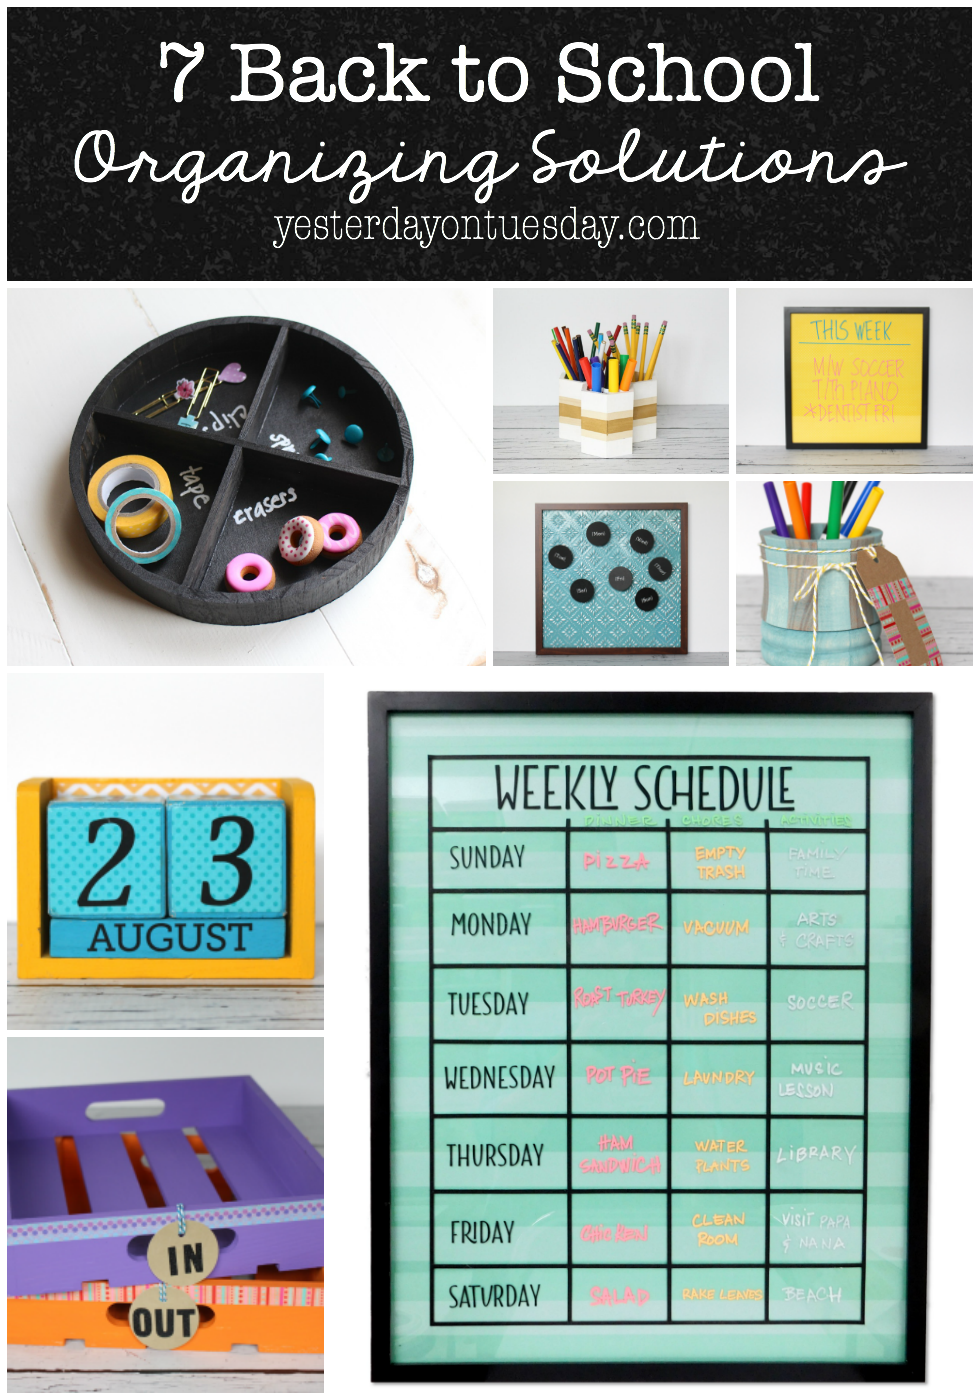
Amazing Apple Cup Ideas
Catch these ideas live on KOMO-4 at 4pm on Tuesday 11/15
Amazing Apple Cup Ideas
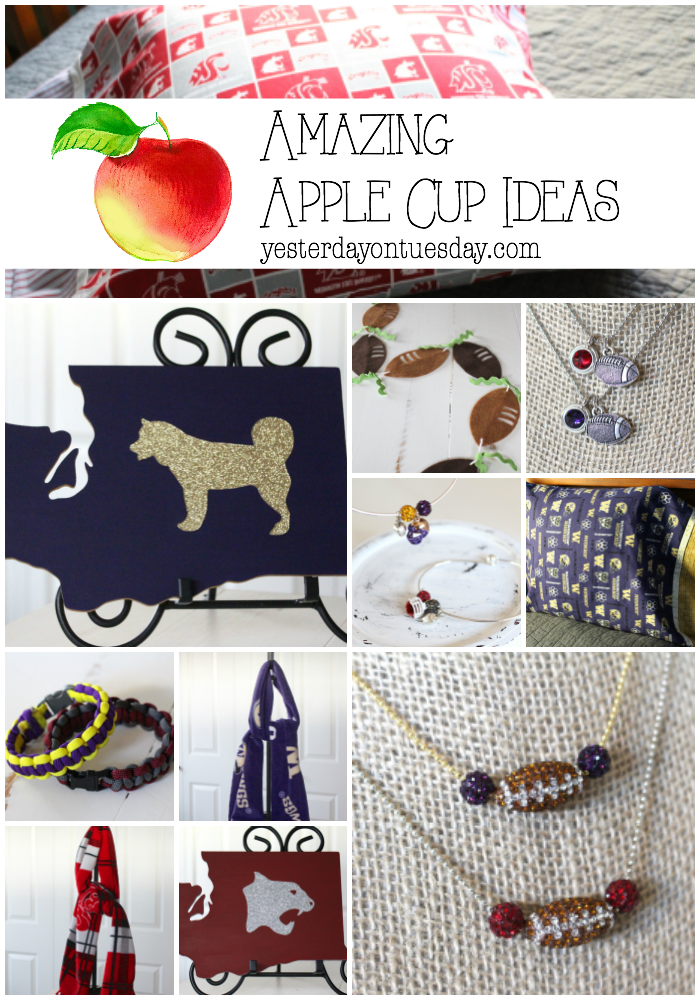
It’s time for that fun football game we all wait for all year long– the Apple Cup featuring the University of Washington Huskies versus the Washington State Cougars! Besides football games, you can also have a good time betting on slot gacor.
Here are some wonderful ideas to show your team pride, featuring materials from Ben Franklin Crafts and Frames in Redmond.
State School Sign

Cougars: Washington state cutout, DecoArt Acrylic Paint in Alizarin Crimson, DecoArt Acrylic Paint in Shimmering Silver, silver metallic paper, cougar head cut out from Ben Franklin Crafts and Frames Die Cut Center, silver ribbon, adhesive.

Huskies: Washington state cutout, DecoArt Acrylic Paint in Dioxazine Purple, DecoArt Acrylic Paint in Glorious Gold, silver metallic paper, husky shape cut out from Ben Franklin Crafts and Frames Die Cut Center, gold ribbon, adhesive.
Directions:
1. Paint sign crimson or purple (may take 3 coats for full coverage)
2.Paint edge of sign with metallic paint (silver for Cougars, gold for Huskies)
3. Die cut cougar or husky from the Die Cut Center.
4. Glue shape on corresponding sign (cougar on crimson, husky on purple).
5. Glue ribbon on back to hang.

Festive Football Banner
Supplies: Nine felt footballs (felt bought and cut out at the Ben Franklin Die Cut Center), white yarn, a hole punch, green rik rak.
Directions: Punch wholes on either side of he footballs. Loop string through holes in footballs. Tie rick ram between footballs.

Apple Cup Football Charm Bracelets
Supplies: Silver bangle (that opens), football helmet charm (husky or cougar colors), apple charm, two school color beads (crimson and gray or purple and gold).
Directions: Slip the charms on the bracelet in this order: apple, bead, helmet, bead. Wear and enjoy!

Football Charm Necklace
Supplies: Seed bead necklace, football charm, purple or crimson gem charm.
Directions: Slip charms on necklace.

Team Bling Necklace
Supplies: Seed bead necklace, two crimson or purple sparkly beads, sparkly football bead.
Directions: Slip beads on necklace in this order: bead, football, bead.

Parachute Cord Bracelets
Supplies: Parachute Cord Bracelet Kit
1. Measure and cut two lengths of Parachute Cord in contrasting colors, each 2 yards.
2. Lay the strands out on the first clip. The center strands should measure between 10″-12″ for a small or large bracelet.
3. Follow instructions for the Cobra Stitch (Square Knot) until about5″ remain on the bottom center strands.
4. Feed the remaining center strands through the second half of the clip. Secure the strands in place and continue with Cobra Stitch over the ends. Remove the paper clip when the center strands are securely covered.
5. Trim the remaining cord and fuse/melt the tips of the Parachute Cord to secure. Use a lighter to melt the ends.
No Sew Football Team Scarf


Supplies: A quarter yard of fleece in purple Husky print or crimson and gray Cougar print (makes one scarf) which is 9″ wide and about 5 feet 3.5 inches long (perfect length right off the bolt), ruler and sharp scissors.
Instructions:
1. Measure 4″ in on both short sides of material
2. Use sharp scissors to create “fringe.” Use ruler to create fringe about 1/2 inch in width.
3. Tie a knot in each fringe.

Team Pride Pillowcase

Basic Instructions with enclosed side seams only. Cuff and trim does not have enclosed seams.
Materials: 42″/45″ wide fabric with directional print
Standard: 1-1/4 Yard Body, 1/4 Yard Cuff, 1/8 Yard Trim
Cutting Instructions: Body 42″ length x 25″ width
Cuff: 9 x 42″
Trim: Cut strip 2″ x 42″
Sewing Instructions:
1. Fold and press trim and cuff fabric in half lengthwise wrong sides together and press.
2. Lay out the main fabric with right side up. Matching raw edges, lay the folded trim fabric along the 42″ edge. Lay the cuff fabric on top. Matching raw edges, lay the folded trim fabric along the 42″ edge. Lay the cuff fabric on top. Pin through all thickness. Note: the trim is underneath the cuff fabric.
3. Stitch all layers together with a 1/4 inch” seam. Press cuff out with seams toward cuff. Topstich 1/8″ from cuff edge toward the trim, stitching through all layers. This will leave a clean finishes edging instead of an enclosed seam.
4. Fold pillowcase with wrong sides together. Stitch 1/4″ seam down the long side and short bottom side. Turn pillowcase wrong side out and stitch again with a 3/8″ seam allowance. This will give you a closed seam with no raw edges. Turn right side out.