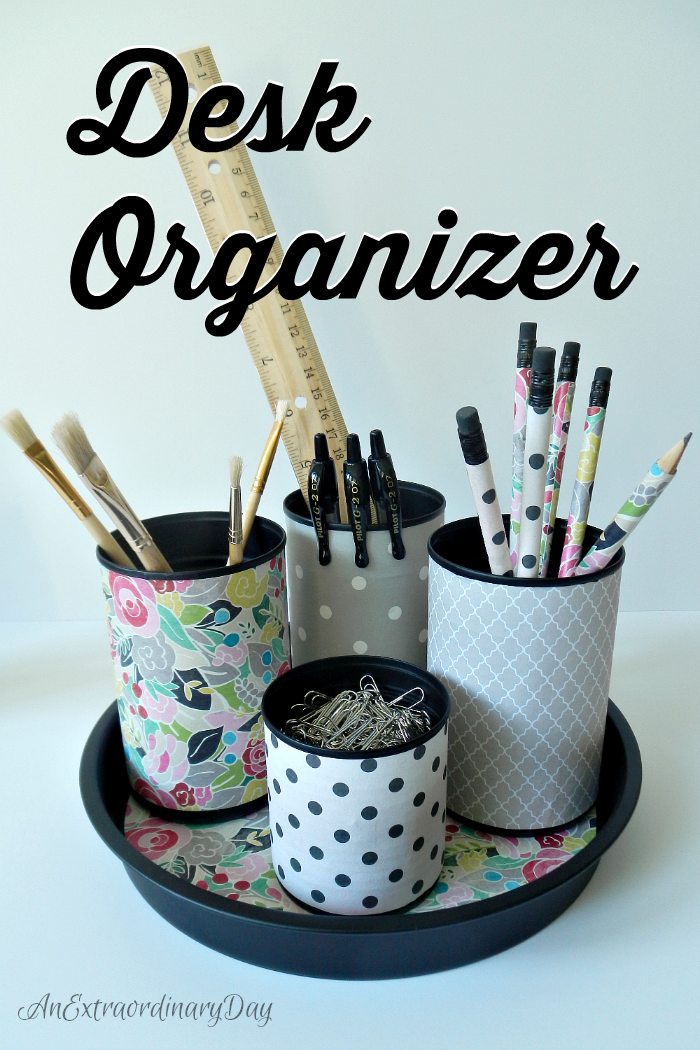
DIY Upcycled Desk Organizer
This project is from my wonderful friend Diane from An Extraordinary Day.
DIY Upcycled Desk Organizer
Wouldn’t you like to get your desk or crafting table organized?
Today I have a fun little crafting project that is easy and inexpensive to make. AND will be sure to give your space a little panache while corralling your necessary supplies. Plus… it’s a great way to recycle those tin cans.
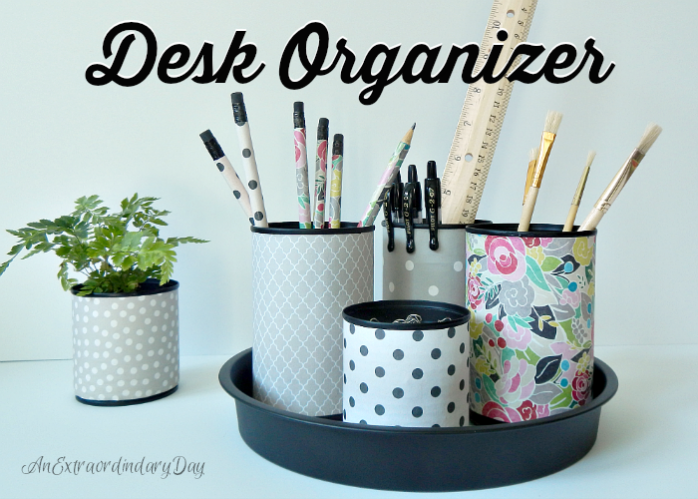
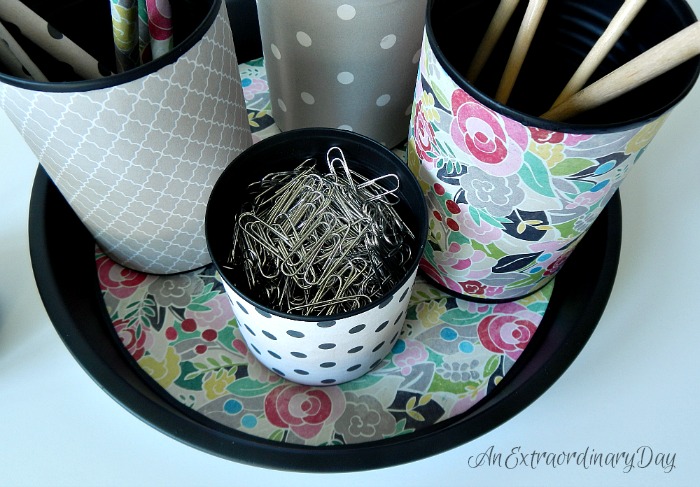
I love how a humble cake pan can become a lovely tray for a group of cast-off tin cans with just a little paint and paper. Together, they make a stylish decorator statement as well as a nifty organizing center.
Don’t keep this project to yourself… it is also a great summer craft for the kiddos to get their study spaces ready for back-to-school.

Let’s Make a Desk Organizer!
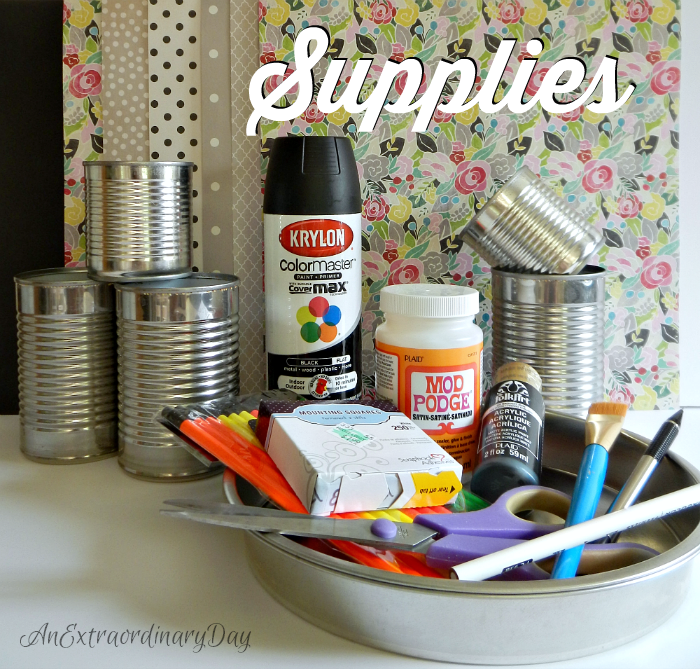
Gather Supplies
- Round cake pan (I picked mine up at the thrift store.)
- Tin cans (I used 3 regular veggie cans and 2 small mushroom cans.)
- Scrapbook/decorative papers (I picked up mine at Michaels on sale for just 25 cents a sheet.)
- Spray paint or acrylic decor paint in your choice of color to complement the decorative paper.
- Mod Podge
- Brush to apply Mod Podge
- Ruler
- Pencil
- Scissors
- Newspaper or large garbage bag to protect your work surface. (Note: the photo shows a few extra items that I decided not to use on this project.)
Steps
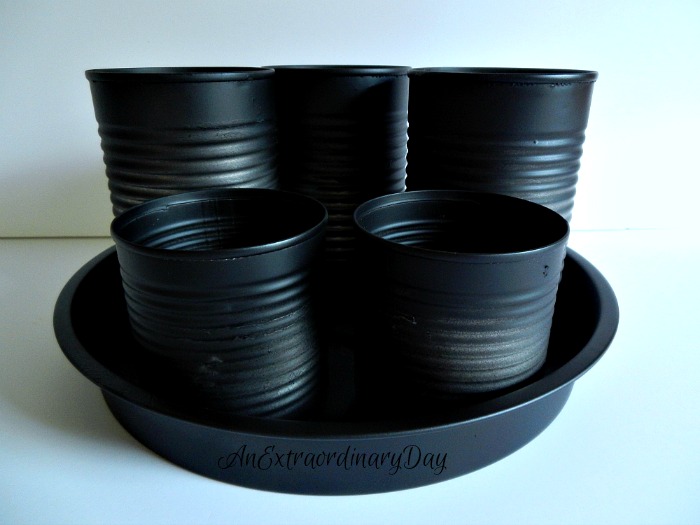
- Paint the area of the cake pan that will be exposed (or not covered with decorative paper).
- Paint your tin cans… top, bottom, and inside. You can skip painting the middle of each can as you will be covering it with decorative paper.
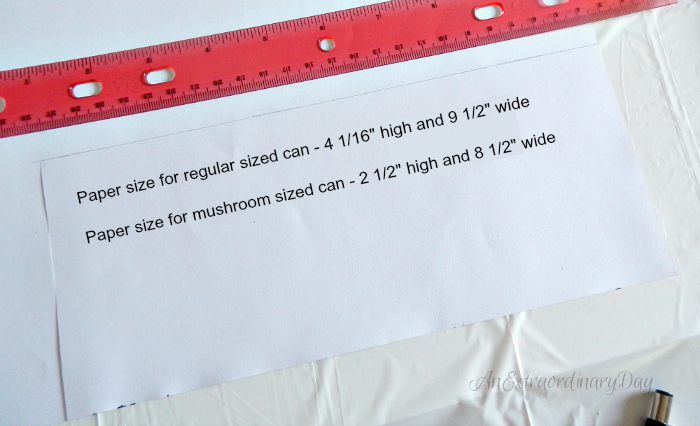
- Measure and cut decorative paper to fit the can as shown. My paper was snugged up against the rolled edge of the can at the top and I left a little space at the bottom for the paint color to show.
Paper size for the regular sized can – 4 1/16″ high and 9 1/2″ wide
Paper size for the mushroom sized can – 2 1/2″ high and 8 1/2″ wide

- On a protected surface, apply Mod Podge to the back of your decorative paper with your brush.
- Carefully align the gluey side to the can using the top rolled edge of the can as a guide.
- Overlap the extra paper and seal for a finished seam.
- Repeat for all the cans.

- Lay your cake pan on the decorative paper and draw a line with a pencil around the perimeter of the pan’s base.
- With your scissors cut inside the line about 1/16″ so there is a small border of painted color on the bottom inside the cake pan when it is applied.
- Paint Mod Podge on the back of the decorative paper you cut into a round shape and carefully center on the inside of the cake pan. Be sure to carefully rub the paper to eliminate any bubbles.
- If you want to protect the decorative paper on your tray, once the paper has dried, apply a second coat of Mod Podge to the top of the paper and allow to dry.
This is one project that won’t break the bank! Because I already had some spray paint and Mod Podge on hand, I was able to create a decorator style desk organizer for just $1.95 — the cost of the decorative paper and cake pan.
There you have it! A pretty desk organizer to put a smile on your face and give your space a little extra pizzazz!
Plus, it’s a great way to add some color and design to your space.
No one needs to know that your snazzy organizer is made of recycled tin cans and a cake pan. I’ll keep it a secret if you will.
Let us know if you’ve been inspired to create a pretty desk organizer.
Do you have any tips for other ways to recycle and organize your supplies?

Connect with Diane on
Facebook :: Pinterest :: Twitter :: Instagram :: Google + :: Join An Extraordinary Day
Facebook :: Pinterest :: Google +
Popular categories at An Extraordinary Day include:
DIY Home Decor, Tablescaping, Joy Day!, Holiday Decor, and Printables.

Vintage Window ~ Winter Mantel ~ Inspiration ~ Window Box Gardening


This is such a pretty organizer and such a great way to upcycle ~ I love it.
Mary Beth|Cupcakes and Crinoline recently posted…Easy to Make Dessert ~ Just 4 Ingredients
Diane, what beautiful organizers! You’ve just given me the perfect idea for a gift for my daughter. Thank you. I’m pinning! :-)
Kim recently posted…PillowCubes – A Pillow Form Review (and Discount!)