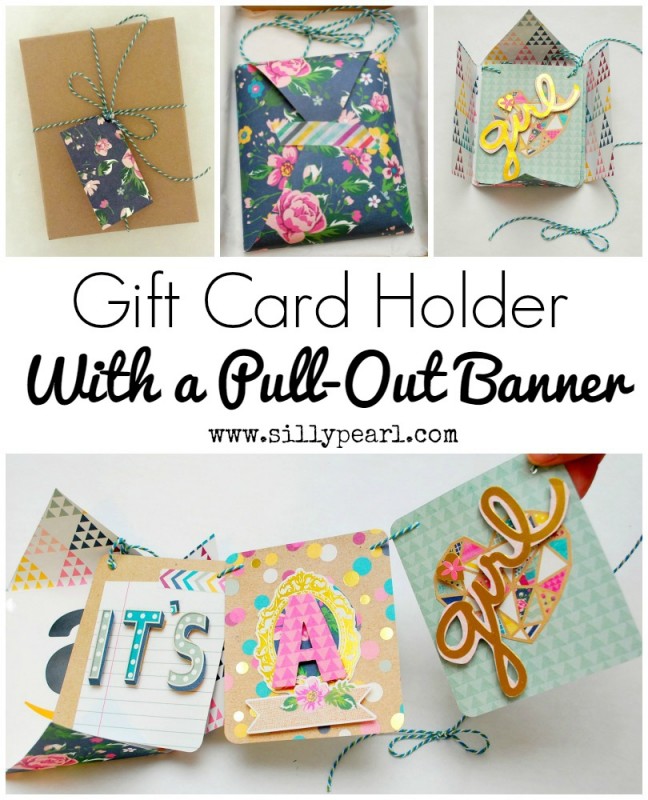
Gift Card Holder with Pull Out Banner
Gift Card Holder with Pull Out Banner
Hello fellow Yesterday on Tuesday fans! My name is Steph, and I blog at The Silly Pearl. I have admired Malia and her blog for a long time, and it was such an honor when I became a co-hostess along with her for our weekly link party, Project Inspire{d}. Today I’m sharing a project of mine that I made as a baby shower gift, to dress up a gift card. It features a banner that the recipient pulls out for a fun surprise, that the parents can hang up to enjoy after the festivities. Here’s how I made it!
Supplies
- Double-sided scrapbook paper and embellishments (ready-made or DIY’ed)
- Scissors
- Adhesive
- Foam Tape (I DIY’ed mine)
- Hole punch
- Baker’s twine
- Washi tape
- Flat gift box
Directions
First, make the envelope. Use a piece of double-sided scrapbook paper (I trimmed mine to 9×12 inches, but you can keep it 12×12). Place your gift card in the center. Fold your paper from the sides and the top and bottom to make creases around the gift card. Then, cut off the four corners along your folds.

Cut the top and bottom flaps into corners by finding the midpoint of the outer edge, and cutting from the corner to the midpoint. You can also do this with the side flaps, but I kept mine as rectangles. Set aside your envelope for now.

Now for the banner. Cut out three pieces of scrapbook paper, just slightly smaller than the sizeof your gift card. You can round the corners if you like, with a corner rounder punch. You can also use either ready-made embellishments, make or own, or do a combination of both as I did. You can also use your Cricut or other cutter, or do everything by hand. This scripty “girl” embellishment was one of my inspirations for this project. It was just the right size for my banner too. I wanted to add a background to help it pop out more, so I traced around it on a piece of paper and cut it out.

After I adhered the two pieces together, I used foam tape to add some elevation so the wording would pop even more. Here’s how I DIY’ed my own foam tape on a recent tutorial of mine.

For my next banner piece, I fussy-cut out some letters from this scrapbook paper, and also used foam tape to adhere them.

And for the last piece, I cut out the letter A by hand and added additional embellishments around it. Again, I used foam tape to elevate the letter.

All that’s left to do is punch holes in your banner and thread some twine through it and you’re done with the banner! Then I punched a hole in the corner of the gift card packaging and tied one end of the banner to it. I attached the gift card to the envelope with some glue dots.

And here’s how I packaged it: I carefully placed the banner into the envelope, on top of the gift card. Then I folded up the envelope and sealed it with a piece of washi tape. And finally, I placed the whole thing in a flat box. I kept the outer wrapping minimal, with a gift tag made out of a scrap piece of paper from making the envelope, since all the fanfare is inside the package!

It was so fun watching my friend open up her gift! It was a different way to give a gift card (they will need it for diapers!). And this project doesn’t have to be just for baby showers, you can make one for any occasion – teacher appreciation, birthdays, Christmas, and more. And instead of a gift card, you do something similar for an invitation.

And it was so fun to be here on Yesterday on Tuesday with this project. I not only do paper crafts but I also love sewing, jewelry making, and DIY. Keep up with all of my crafting on The Silly Pearl, plus on Facebook, Twitter, Pinterest, and Instagram.
Thank you so much Malia for having me on your blog today!
-Steph-

This is such a fun idea Steph! Pinning for later reference. :)
Kelly of Simply Kelly Designs recently posted…Summer Memories Jar
Thank you so much, Kelly!
I love this!! What a great idea!! Pinned!
Diane | An Extraordinary Day recently posted…My latest faith lesson… God delights in serving me :: It’s JoyDay!
Thanks, Diane!
Steph @ The Silly Pearl recently posted…Chess and Checkers Travel Pouch Set